`
Showing posts with label nail art. Show all posts

Sunday, May 29, 2011

Cina Nail Art Pen Manicure

 After renewing my Sally Beauty Club card, I had a 5 dollar gift certificate to use in store, so I decided to pick up a Cina nail art pen. Mainly, I wanted to try doing a leopard manicure and I wanted the precision of using a pen versus a skinny nail brush, like on my Art Deco nail art polishes.


Directions:
Shake pen and depress nib to freshen the nib with nail polish before each use.

 Nib? Who decided to call it that? What about tip? Okay...anyway.

Basically its like a marker with nail polish in it! Awesome concept, bad execution. Like a cheap dollar store maker, it seemed to dry up and run out of polish, even after shaking it several times. Fail. Especially since this was my FIRST time using it. I tried shaking it and waiting a bit between each nail, but I was still not able to complete a whole design without the design fading or starting to get lighter.

Here's the finished product:
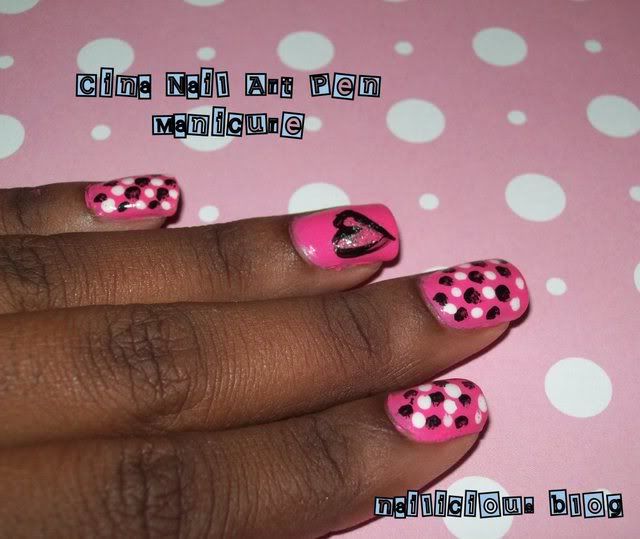


Verdict?

Cina, see you later! If I want to use this again, I'll probably have to let it rest for a day or two. But even then I'm not so sure this has what it takes to complete my nail art designs.


♥ Lachelle

Saturday, December 11, 2010

Snowflake Manicure for Holiday 2010-Fail!

 Turning to YouTube for more Christmas manicure inspiration, I found this adorable snowflake tutorial. Well, I found that drawing snowflakes on your nails is a bit hard, especially if you don't have a good brush. I only did the design on two nails before I gave up.


I used Sally Hansen Blue Me Away, Ruby Kisses White and a very light coat of Wet n Wild Kaleidoscope just on the tips. I really want to try this again with those Sally Hansen nail art pens. I think it would be much easier for me to do this with a pen, rather than a brush. 

Still looking for more Christmas mani ideas,
♥ Lachelle

Wednesday, July 7, 2010

Zoya Ali + Nail Art

Zoya's Ali is one of my top 3 favorite pink nail polishes. Yes, that does mean something coming from a pink obsessed blogger, I promise! Ali is an instant pick up, so this past week when I was feeling sad I decided to do my nails in this bright, cheery color. Its been uncharacteristically cloudy and rainy in Texas, but you can see this neon pink a mile away. As if that wasn't enough, I got my Art Deco polishes and dotting tool and went to work. I ended up with this:

 -Lachelle

Sunday, July 4, 2010

4th of July Nails 2010


I love the 4th of July, its my favorite holiday. I think the barbecue has a lot to do with it! Its also the one time of year I actively search for a red nail polish to use. This year I was stumped for ideas until the last minute, but a little trip to Sally's changed that. They are having a fabulous clearance sale and I picked up a perfect blue, Orly La Playa from their Viva 2010 Summer Collection. La Playa is a opaque gorgeous navy blue creme, what you see in the pictures is one coat. On my middle and pinky fingers I did one coat each of Wet n Wild French White Creme, OPI Himalayan Hideaway and Orly La Playa. The stripes I did with my Art Deco polish in silver. The stars on my ring finger are by Nailene, who might I mention make great nail stickers!

What did you do for the 4th of July? Got any festive manicures you want to share?

-Lachelle

Friday, June 18, 2010

Rainbow Tiger Striped Nails!

Let me say that Twitter is awesome; if you aren't there, then you should be! The exchange of ideas on there is constant and you can really find some cool people on there. I follow China Glaze on Twitter and they tweeted about a Tumblr that showcases pretty nails. That's where I got this manicure idea from Artsy RN. She's a pretty cool girl who does some really cute nail designs. Though its not specifically a nail blog, she posts about nails a lot, so I would check it out if you want inspiration.

Here are the supplies I used:

L to R:
  • Sally Hansen Blue Me Away
  • Essie Pansy
  • Zoya Creamy
  • Wet n Wild French White Creme
  • Seche Vite topcoat
  • Art Deco Nail Art Polish in Black
  • Makeup sponge
Artsy RN made a YouTube video tutorial which I used as my guide:


The Results!

As you can see, sponging your nails can get a little messy. So this is what they looked like before clean up:


This is Day 2. Getting a little tip wear, but I think it held up well considering the fact that I was moving. The white polish is a cheap, chip-tastic polish so when I do this again I want to use another white polish.


I used my go to topcoat Seche Vite and it kind of smeared the black stripes a bit. Next time I will use a different topcoat. Also you can reuse your makeup sponges just by cutting the used tip off.


Image and video hosting by TinyPic

Sunday, April 18, 2010

I Tried It: Zebra Striped Nails!

Lately I've been seeing zebra striped nails a lot, so I took to YouTube to find out how to get the look. Using this video tutorial I did my own Zebra nails. I was pleased with my results and it was fairly easy to do!

Here are my supplies:
L to R: Sally Hansen Celeb City, LA Colors Art Deco nail art polish in Black, Orly Sec N Dry, Zoya Armor. 
Note about Orly Sec n Dry: I only used this topcoat on 2 nails because I noticed it was making the black polish I used to make my stripes smear, even though I waited 15 minutes for it to dry! Not sure why, but I switched to Zoya Armor as my topcoat.

The final look:
 Super shiny silver! I really like SH Celeb City.

 Right Hand


For my first try, these are not bad! The thing I like about zebra striped nails is that each nail is not exactly the same. You don't have to be perfect with placing the stripes and ultimately they look better when both hands are done. This look is not that time consuming either. I just did two coats of Celeb City, let that dry and then went to work on the stripes. It only added about an additional 10 mins to my regular routine. 

Do you like animal print nails? Want to try it? Been there, done that? Let me know!


Image and video hosting by TinyPic

Tuesday, October 20, 2009

My attempt at a gradient manicure

Notice, the key word in the title of this post, attempt. This was much better in my head, but not so great in translation. I like the new color I made though. Here are the colors I used:

Zoya Malia as the base, China Glaze Grape Juice as the second coat, Sinful Colors Purple Diamond as the third coat.

The manicure:


I think I'll try gradient manicures again, but with other colors. Pink and blue come to mind...

____________________________________________________________

** A NOTE ABOUT COMMENTS LEFT ON MY BLOG*

I've been really busy with school and projects lately so I may be slow to responding. However, I DO appreciate all the comments you've left! Thanks for stopping by!

Monday, August 10, 2009

Lady in Red Nails

Here's what inspired me to do "Lady in Red" nails. I say inspired me, because I didn't do the exact same nails, but a version of them. I wanted to do the original but last night I could not find white nail polish. It was too late to go to the store too. How does that even happen?! Check out the hotness:


This nail design is enough to make me overcome my aversion to red nail polish! Well, just for this manicure. I love this color theme, I want to do my living room in these colors. I digress...

Anyway, I made some changes to my manicure. Like I said, I didn't have the white polish so I couldn't do the white tip in Step 1. Also, I'm kicking myself for not getting rhinestones so I couldn't put them on, like in Step 3. Instead I used a dotting tool to make red dots in the grid squares and it didn't come out as well as I pictured it. I only did the design on two of my fingers on each hand and it suits me just fine. This design on every finger might have been too much for me. Okay, so here's the final result:


The polishes I used were:

  • Claire's Black (no name on the polish)
  • OPI Himalayan Hideaway
  • LA Colors Art Deco polish in white
  • Stripe Rite polish, silver glitter
  • Seche Vite


Friday, August 7, 2009

Polka Dots!!!!

Okay, if you follow me on Twitter or have read my blog enough you will know that I have been on a mission to do polka dots on my nails. I even got a dotting tool from Sallys. I thought to myself , problem solved. Well I still didn't get it right, I thought it was the dotting tool, then I thought it was me. I thought I must be the only person in the world who cant make polka dots. So last night after reading a tutorial on Steph's Closet I decided to give her manicure a try. The solution was simple! It was the polish I was using. I always used this white polish because I wanted white polka dots, but that polish was very old and clumpy. No wonder I couldn't make one polka dot without a string of polish following it on the dotting tool. Now it almost seems obviously ridiculous!


I like this, but I shouldn't have added that white stripe along the bottom. I was just so excited that I did a little too much. Oh well, this is only staying on for one day. I'm trying again tomorrow!


LinkWithin

Related Posts Plugin for WordPress, Blogger...